I am pleased to kick off 2015 with a series of short tutorials posts, showing how images are taken from an unprocessed format to final edits for printing in photo albums and displaying on the web. You will be familiar with JPEG as a format for storing images, its a very versatile format which has become the standard for most people. I shoot in a format called digital RAW which is often described as a digital negative. RAW stores the maximum information available in an exposure directly from the camera sensor with the files being larger in size to JPEGs.
Using a mixture of tools including Photoshop and Lightroom, images can be processed digitally to enhance colours, details, retouching and removing distracting elements.
Enhancing images using such tools helps complete the creative journey and achieve the initial vision seen through the lens of the photographer.
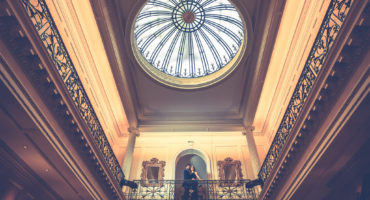
The below image was taken at a wedding last year, a classic scene with the bride arriving with her father ready to be greeted by her husband-to-be (taken at the Wasing Park in Aldermaston). This image is usually an instant hit with my clients as it represents a key moment of the day. With the groom out of focus we are maintaining sharp focus on the bride but capturing some real emotion as they both lay eyes on each other for the first time. This is also referred to as the ‘big reveal’, you get the idea. To achieve this shot you must be able to communicate effectively with the bridge and groom, family and the Registrars, choosing where you will stand and getting the light just right.

So lets’s have a look at the original image. This is straight out of camera and though it tells the story well it could be enhanced to make it more compelling.
Some observations from the RAW Unprocessed image :
- Could do with slight adjustment to brightness
- Distracting lights above the door
- Lighting flare on fathers trouser
- RAW images are flat and require sharpening and colour enhancement
- Colour balance could be enhanced further

So here we have the AFTER image, can you spot the differences ?
Here are the changes/tweaks that were applied.
- Lights removed using cloning
- Colours enhanced – maximising dynamic range and using richer colours
- Sharpening applied to taste
- Removed flare using healing brush
- Recropped image losing 2 lights at the very top of frame
- Slight vignette applied to focus on centre of the frame
- Brushed some brightness into father and bride
In summary, using editing tools is not about applying presets and churning out images that all look the same. The process is to enhance and ‘MAKE’ images.
Hope you learnt something from this short post. Feel free to share your thoughts below and LIKE on Facebook to be informed about future posts like this.
Thanks.